28th October, 2018
How do I share dependencies between Android modules?
With the benefits that modularised projects bring it would seem like this should be a solved problem, but it’s only recently that a good solution to managing multi-module dependencies has become available.
As of late 2017, there was no satisfactory solution to this problem. The best option was to declare dependency version strings in a shared build.gradle file to ensure that each module implemented the same version of the library.
This works, but the repetition isn’t great and the solution doesn’t scale well as module count and complexity increases…
Introducing Gradle 4.0 🎉
In October 2017 Gradle 4.0 was released along with Android Gradle plugin 3.0.0. Some of the improvements included faster build speeds due to better parallelism, Java 8 support for certain features and faster incremental builds.

However, the change that we’re interested in was the addition of new Gradle dependency configurations.
Hopefully by now you’re already using Gradle 4.0+ with Android Studio Gradle plugin 3.0.0+, but if not you’ll first need to update.
New dependency configurations
Two new dependency configurations replace ‘compile’ and allow us to decide whether a modules Gradle dependencies are accessible to any other module which depends upon it, or only within the module. (a simple comparison is using public/private to set the visibility of variables/functions). This allows us to keep a clear layer of separation between modules while removing the repetition of declaring dependencies in multiple modules.
Previous dependency config
compile 'example.dependency:1.0.0'
Hopefully this looks familiar to you. We’re declaring our dependency on an external library within the module that requires it.
New and improved dependency config
implementation 'example.dependency:1.0.0'
// or
api 'example.dependency:1.0.0'
implementation → this dependency is only available to entities within this module
api → this dependency will also be available within any module which depends on this module
The change is as simple as that. For any dependencies which should be self contained within the module, use implementation. For any dependencies which should also be made available to modules which depend on the module, use api.
Architecture
We can now replace compile with either implementation or api depending on the structure of our modules and setup a chain of dependencies which makes sense for our architecture.
Here are a couple of simple example projects with alternate module architectures and the correct usage in each case.
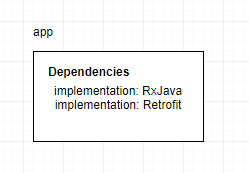
Here’s a simple app which has only a single module: app. In this case we only need to replace compile with implementation as there are no other modules which might be able to share dependencies.
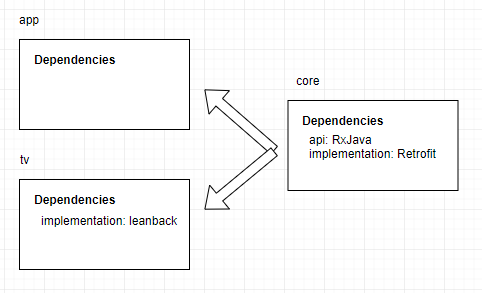
Here’s a more complex app with three modules: app, tv and core.
-
Both app and tv modules depend on the core module
-
only the core module should interact directly with Retrofit, so we use implementation to ensure that the library is inaccessible from app and tv.
-
RxJava is required in all three modules, therefore we can use the api config to ensure that all projects depending on core can access RxJava.
Hopefully a similar structure can apply to your project, but please leave a comment if you have a problem working out the correct dependency flow.
Notes
I recently answered this question on StackOverflow which inspired this post, check out the question for further discussion and the older solutions.
If you’re not yet taking advantage of a modularised android project, check out this detailed blog post for detailed information on the build time improvements.
Thanks for reading, please let me know if I’ve missed anything or if you have any further tips.